AIIM (Am I In [a] Meeting?)
This app will detect if you are in a meeting in Zoom or Microsoft Teams by looking at your tasklist and send a REST call to a Raspberry Pi which will either control a simple LED or NeoPixel LED .This was written to work with Windows for now but I will try to add Mac and Linux support. I welcome pull requests! This does NOT utilize any kind of APIs to determine if you are in a meeting. No APIs means lower risk for data exposure (I understand there has been a lot of concerns around zoom privacy and security).
Demo
(Coming soon)
Table of Contents
Getting Started
How does this work?
Here’s a quick summary of how things work:
- Python script is run on a schedule using Task Scheduler which checks for the Zoom or Microsoft Teams processes.
- If you are in a meeting, the script makes a REST call to a Raspberry Pi running a Flask app.
- Depending on your settings, it’ll either turn the GPIO on/off or do some cool things with NeoPixel LEDs.
Zoom meeting detection works really well. However, Microsoft Teams isn’t guaranteed. The way this script tells if you are in a Teams meeting is by reading the Window Title. When you first enter a meeting, the window title is “Meeting | Microsoft Teams” - however, if you switch to chat or activity or any other tab within Teams, the window title changes and DOES NOT change back to “Meeting” even after you go back to your meeting. It’s very strange.
There are two directories in this repo: Windows and Raspberry Pi;
The Windows directory contains the script that will be run on a scheduled task on your Windows machine. And the Raspberry Pi contains the Flask app that needs to run on your Pi. More info on the Flask app can be found in the Raspberry Pi Setup section below.
Windows
You need Python 3+ installed locally. I recommend at least version 3.6. Check out the official documentation on how to install Python on Windows here: https://docs.python.org/3/using/windows.html
I also recommend making sure Python is available as a path variable so that you can run it on a basic command prompt without issues.
aiim/config.py
The config needs some of your attention. Edit the config.py file:
PI_URL = 'http://'
URL_CONTEXT = 'led'
LED_TYPE = ''
ZOOM = True
TEAMS = True
THEME = 'random' # valentines, cool, nature, random (blank = random)
Change the PI_URL to your Pi’s IP address or hostname.
The URL_CONTEXT by default is led. If you change the context in the Raspberry Pi Apache Configs, change this value.
The LED_TYPE will take one of two values: simple or neopixel. The simple led type is if you’re controlling a basic LED. This can actually be used with relays and transistors as
well. Endless possibilities since all this does is turn a GPIO pin on and off. The neopixel led type requires you to use WS2812x LEDs. This is similar to my
Dancy Pi set up. neopixel is currently the default.
By default, both ZOOM and TEAMS are set to true because the script will look for both. If you only want to look for
one or the other, change the value to False. Changing both to False will mean that they are both True.
The THEME is just something I added for fun. The default is that a random color is set for each LED, but there are 3 built-in “themes”: valentines, cool, nature, and random. It’s not
necessary to pass this parameter, but if you do, you’ll get a themed color:
- Valentines: redish colors
- Cool: blueish coloes
- Nature: greenish colors
- Random: the default - randomly generates a color
aiim/check_proc.py
I recommend running things in a virtual environment, but it is not necessary. The only requirement this project has for Windows is requests and I think it’s fine to install that globally.
But if you want to install a venv, you can do so by going into the Windows\ directory and running:
python -m venv venv
This will download an install a virtual environment called venv. Your directory should now have a venv\ directory along with your aiim\ package. This app is not complex
so it doesn’t really matter where your venv gets installed.
Activate venv with this command:
venv\Scripts\activate.bat
This should add the (venv) prefix to your command prompt line, indicating that you are in your virtual environment. You need to then install the requests module so that you can
make a REST call:
pip install requests
If you already have your Pi running, you can test the script with:
python check_proc.py
It’ll either error out or give you nothing.
The main part about this script is the command to generate the task list:
os.popen('tasklist /fo table /v /fi "imagename eq CptHost.exe" && tasklist /fo table /v /fi "imagename eq Teams.exe" /fi "windowtitle eq Meet*" /nh')
This invokes the tasklist command twice. The first time it looks for CptHost.exe which is the process for a Zoom meeting. Zoom is simple so as long as that’s running,
you’re in a Zoom meeting.
The second is it looks for Teams.exe which is the Microsoft Teams process. But we need to filter it further to look for a window title to equal to Meet* because we are searching for
a window titled “Meeting | Microsoft Teams”.
As mentioned above, Microsoft Teams is a little weird. If you start/join a meeting, your window title will be “Meeting | Microsoft Teams” - however, if you switch to enter component within teams (e.g. activity, chat, etc.), the title will change and the app will think you are no longer in a meeting (once the scheduled task runs). Even if you go back to your meeting in Teams, the window will NOT change back to “Meetings | Microsoft Teams” - why? I don’t know.
The app is more accurate for Zoom meetings than it is with Microsoft Teams.
The /v flag is for verbose so the call can take a long time. However, adding the /fi flag for filtering makes it significantly faster!
Scheduled Task
We are trilling the check_proc.py script using a Scheduled Task in Windows. You can set this to any schedule you’d like, but I recommend running it during work hours (plus/minus
an hour or two depending on how long you actually work) starting at minute 01 (meaning start it at 8:01 AM instead of 8:00 AM) because it could take you a minute to join a meeting.
And then run this every 5 minutes (so it’ll run at 8:01, 8:06, 8:11, etc.). At best, the script will know you’re in a meeting within a few seconds and at worse, you’ll have to wait 5
minutes.
Here’s an example of the Scheduled Task trigger:

The task runs from 8:01 AM to 6 PM (10 hours duration) every 5 minutes Monday thur Friday.
Here’s an example of the the action:
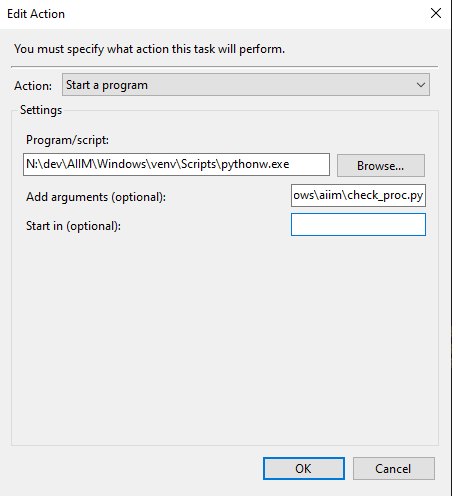
The “Program/Script” should use your pythonw.exe - if you are using a virtual environment like I am, put that path in. If you are using your global, find where your global pythonw.exe
is located and put the path in there.
NOTE: We are using pythonW and not just python - this is necessary in order to run this script in the background. If you don’t use the W, it’ll open a command prompt every time
it runs and you’ll see it in your taskbar.
One downside of using pythonw is that if the app fails, it’ll fail silently and will not warn you. pythonw simply starts the script then exists. I do want to set up some kind of
logging in the future to output errors so that you are aware.
The “add arguments” should be the path to your check_proc.py - where ever it’s stored. It should be the full path because your Task Scheduler won’t know where to look and the script
won’t run.
I am running it every 5 minutes, feel free to run it every 1 minute if you desire. Windows Task Scheduler doesn’t let you set an interval of less than one minute.
Detecting Meetings
Some of this is repeat from above but more organized in its own sections. The script uses your tasklist to see what processes are running. The main command is:
os.popen('tasklist /fo table /v /fi "imagename eq CptHost.exe" && tasklist /fo table /v /fi "imagename eq Teams.exe" /fi "windowtitle eq Meet*" /nh')
Zoom
The Zoom meeting process is CptHost.exe - it is the image name and is pretty simple. If it’s detected, your are in a meeting!
Microsoft Teams
Microsoft Teams meeting is run within the Teams.exe process, so we filter our tasklist for this process first. Then we filter it further and look at the Window Title of Meet*
because we are searching for a window titled “Meeting | Microsoft Teams”.
If you start/join a meeting, your window title will be “Meeting | Microsoft Teams” - however, if you switch to enter component within teams (e.g. activity, chat, etc.), the title will change and the app will think you are no longer in a meeting (once the scheduled task runs). Even if you go back to your meeting in Teams, the window will NOT change back to “Meetings | Microsoft Teams”.
Raspberry Pi Setup
The Raspberry Pi set up is more simple in the sense that I’ve covered these topics many times in previous tutorials. The main thing to know is that the Pi app is a Flask app running behind Apache so that you can make simple REST calls to turn your LED on and off.
Another way of handling this would be MQTT which I MAY add to this script in the future.
In the meantime, the topics you will need to know are:
Please note that the second tutorial above is a culmination of these three tutorials which goes deeper into their specific topics:
Installation
To install this on your Pi, you can clone this repo to your local Windows machine and copy over all the files in the Windows\ directory to your Pi. But the Raspberry Pi piece is
pretty simple so cloning the whole repository again may not be necessary. So I’m including a .zip you can WGET in the RaspberryPi/pi_dist directory. In your Pi, do this:
cd /var/www/html
sudo wget https://github.com/naztronaut/AIIM/raw/master/RaspberryPi/pi_dist/led.zip
sudo unzip led.zip -d led
This should unzip and put everything in a /led directory. Then cd into the directory, install the virtual environment and take ownership of everything:
cd led
python3 -m venv venv
sudo chown -R pi:pi *
For some reason, the activate_this.py file no longer comes with venv and it has been removed from their official repository. I need to read more about why that is and make updates,
but for now, you need to download it manually in order for the app to work:
cd venv/bin
wget https://raw.githubusercontent.com/naztronaut/RaspberryPi-RGBW-Control/master/utils/activate_this.py
Learn more about the Apache set up here: https://github.com/naztronaut/RaspberryPi-RGBW-Control#apache-and-wsgi—web-server
Configuration
There are a couple of configuration considerations to take. The first is the GPIO pin used as the data pin. By default, the pin used for both simple and neopixel set up
is GPIO Pin 18. If you want to change this for the “Simple” set up, the following value for PIN should be changed in led_service.py:
PIN = 18
If you want to change this for the “NeoPixel” set up, change the D18 to D# in neopix.py:
pixels = neopixel.NeoPixel(board.D18, LED_COUNT)
The second config change to consider if you’re using the ‘NeoPixel’ set up is the LED Count in neopix.py. You need to tell the app how many LEDs your set up has by
changing the value of LED_COUNT shown below:
LED_COUNT = 142
The default is 142 LEDs since that’s what I have. This should work with any number of LEDs, whether you have 1 or 300. The only limitation that you may run into is current.
Simple vs. NeoPixel
The only addition is that since this script allows a “Simple” or “NeoPixel” LED output. By default, the script uses “Simple” which means it only turns the GPIO pin on or off. It’s simple but you can do a lot with it. You can turn an LED on and off, you can control a relay which controls an actual appliance, a transistor which can turn on and off really fast. If you are using the Simple mode then you don’t have to touch the script.
However, if you want to use the ‘NeoPixel’ mode. You have to take a few actions. First, we need to install the adafruit-circuitpython-neopixel library. To do this, if you are
using a virtual environment, activate venv, then run the command below. If you are not using a venv or want to install this globally, prepend the command below with sudo
as you’ll need higher privileges to run the script.
pip3 install adafruit-circuitpython-neopixel
Get more info on this library at https://pypi.org/project/adafruit-circuitpython-neopixel/
Make sure your power supply can supply enough current (I recommend at least a 2A power supply if you have more than 100 LEDs). The status of the lights is stored in
neopixel_status.txt as either a 1 for on or 0 for off. The status of this can be retrieved using the meeting_status endpoint below.
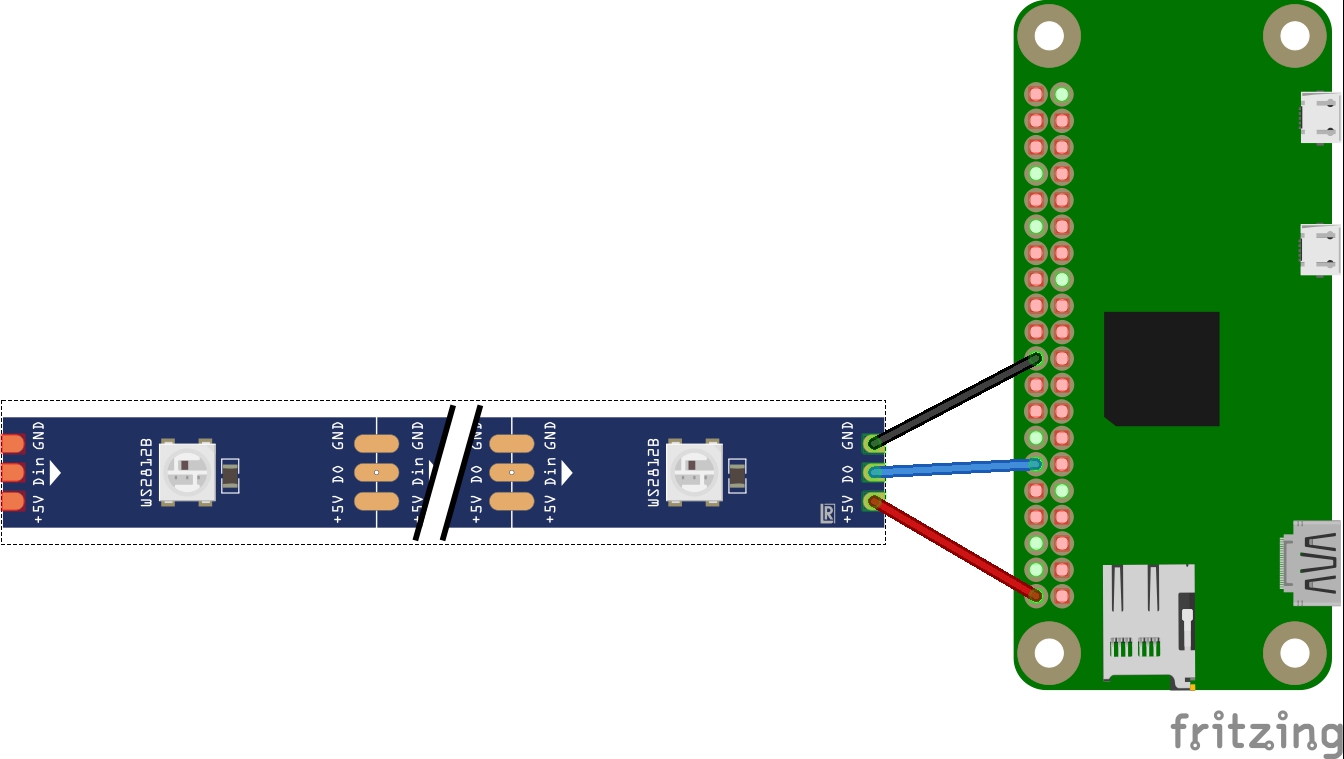
Here’s a small Fritz diagram of how to wire the Pi with your WS2812b LED strip:
Endpoints
/led?type=&theme=&status=
We’ll use a simple REST call to trigger that will turn on or off an LED based on a scheduled task as shown in the example below:
http://{ip_addr}/led?type=neopixel&theme=nature&status=on
You either send a simple or neopixel as the type and on or off as the status. The theme parameter is not necessary but the way check_proc.py is coded, it’ll send a
theme by default to both types of calls. If everything is set up as expected, the status of on or off will turn the light on
and off. If you decide to change the context path in the check_proc.py file from /led to something else.
/led/meeting_status
The following will return the meeting status as either True or False. Only supports NeoPixel lights for now since that’s the only status currently being saved.
http://{ip_addr}/led/meeting_status
And the output looks something like this:
{
  "meeting_status": true
}
Future TODO
I do want to do a little bit more with this script. Currently, it’s a 1:1 set up. It can be easily modified to allow multiple inputs to turn on multiple LEDs and I will work on making that a little easier to set up.
MQTT may be a great way to communicate with the PI. I want to set up a version that publishes a message to an MQTT broker instead of making a REST call.
Other TODO TBD.
Authors
- Nazmus Nasir - Nazmus - Owner of EasyProgramming.net
License
This project is licensed under the MIT License - see the LICENSE file for details
Questions ?
Have questions? You can reach me through several different channels. You can ask a question in the issues forum, on EasyProgramming.net, or on the video comments on YouTube.
Contribute
I will accept Pull requests fixing bugs or adding new features after I’ve vetted them. Feel free to create pull requests!